
Heyo again! The time has come to get this thing started. For the following year, I’ll set out to make a game with a bunch of friends and colleagues. We are still in the very early stages of conceptualization and ideation, but that doesn’t mean I can’t get some prep work done so we can jump right in when we have a solid high-level design. I’ll most likely break the whole setup process into smaller parts, so that it is easily readable and I can focus on each individual thing that will bring the project together in a little more detail, instead of throwing it all out there.
So, here goes!
Games are a complex piece of software, that differs quite a lot from traditional app development. The larger the scale of course, the more complex things get, and when you consider that a game requires many disciplines to be completed, one should consider how the development workflow and pipeline will look when e.g 30 people work simultaneously. It is apparent that a “Game Jam” approach will not deliver the expected results and will eventually create tech debt that will blow out of manageable proportions. On top of that, any designers, artists, narrative designers, or even other programmers will have little, to no idea where and how an implementation is done, and will most likely spend 90% of the time searching the codebase, or the project instead of doing what they are actually good at.
Even in smaller teams, the above still stands, however, assuming the project scope is on a smaller scale, and the team is on a daily communication channel between them, a more “free” approach may be manageable, but that doesn’t mean it will be efficient. Defects will surely arise there and will cost extra time.
So, How do we solve this?
For the first section of this blog, we’ll focus on the tech/code side of things, before moving into actual Project and Folder structure, as well as prefab and prefab variant hierarchies that will allow us to simultaneously maintain the project while targeting multiple platforms, and require the minimum amount of ”extra” work possible.
At this point, I’d like to introduce 3 key “tools” that I’ve been using for a while and have proven to be scalable, adaptable, and quick to pick up for the most common uses.
- Zenject – Dependency Injection
Dependency injection is the act of a class “requesting” its dependencies instead of creating or asking for them internally. Unity is a very easy tool to get into, but it is also equally easy to misuse it. Here’s where dependency injection comes in. References are no longer part of Unity’s drag-and-drop flow unless needed by designers, which means they need to be publicly (or better yet [SerializeField]privately accessed. So, by constraining ourselves on the above statement, we can only “reference” things in the editor that we want non-coders to be able to swap around. Instead, we now have a single point of entry (in each scene) where dependencies are Bound and Resolved between the objects that need them.
That allows us to always have concrete knowledge of where and why an object is aware of another and the references are not an encrypted mess of editor references that no one can find after a while.
Additionally, dependency injection allows for carefree injection when creating new classes, as the “state” is irrelevant, and the Container can always resolve the dependency as long as the Context (scene) is the same. That means that we no longer have to think of all the possible states when creating a new class or object, on how and where we would retrieve the reference we would need to use.
Lastly, by having different contexts in each scene, we can specifically create a cascading “installation” flow for shared dependencies between all our platforms, and on the leaf level of our installations, we can specifically add dependencies for that specific platform.
To illustrate with an example, let’s assume you want your user to Rate your game. Each separate platform has different ways to show, rate, limitations, restrictions, etc. The regular unity way of solving this issue would be to create mono behaviours attached to each platform scene that handle the “rate me” flow for each platform. That in itself is not that bad, but when you scale it to 200 platform-specific implementations, you end up with a complex hierarchy, that may sometimes, if not maintained properly, end up holding multiple mono behaviours on managers, with references attached explicitly to the editor, etc. It can quickly get out of hand and take a long time to pinpoint, where the behaviour is to make the slightest change. What Dependency injection allows us to do is wrap everything in a IRateMeService interface with an async RateMe() method, that each platform implementation will provide implementation for.
Whenever you require the “RateMe” flow to happen, you can directly inject the interface (IRateMeService) and await the method as needed, while Binding takes place in each platform’s installers. That way, there is a single point of entry for each RateMeService per platform, and changes can be made in code directly. MAGIC!
(snippet of a shared bootstrap installer for all platforms)

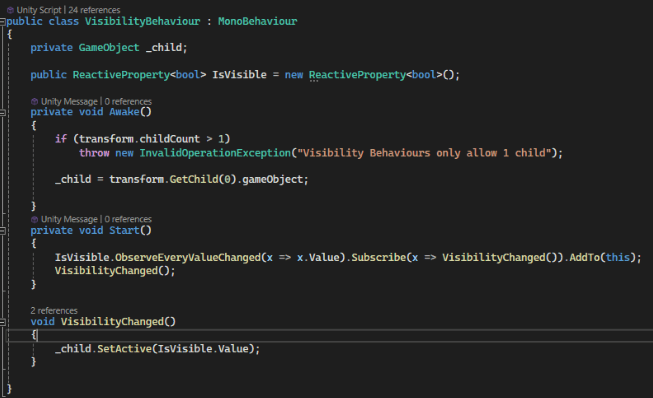
- MVP or Model-View-Presenter and UniRX
MVP- or better known as Model-View-Presenter pattern. As stated by Microsoft’s documentation, the MVP pattern’s objective is to separate business logic from user interface (UI) logic to make the code easier to understand and maintain. That is a crucial part of any development, as it is usually requested by everyone to have access and be able to change the view of a UI screen, without having to constantly request code changes.
The Model holds your data, that is changing at runtime, the View is responsible for handling the logic of How and When we should be showing things, while the Presenter, in our case is Unity’s UI hierarchy.
Using the MVP allows us to separate the data, from the functionality, from the view. That eventually makes it quicker and faster to iterate when it comes to UI changes, as most of the time, the only thing that needs to be maintained is the “View”.
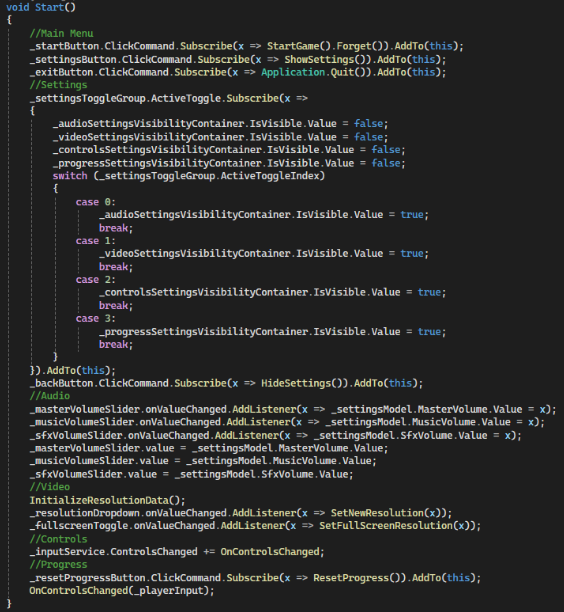
To facilitate the above, however, we needed some way to create Data bindings and notify any interested consumers that the Data has changed so that the UI can update. This is where UniRX comes in. It allows us to create Reactive Properties and Commands. What that means essentially, is that we can now create Subscriptions from other places and get notified when the internal values of our data change, effectively allowing us to respond on the UI. To further build on this idea, you can create “generic” wrappers of Unity’s UI behaviors like buttons, labels, toggles, toggle groups, etc, to allow you to reuse the same prefabs with different bindings in all our views, effectively allowing you to “re-skin” the UI for the whole game, on-demand as long as you make changes on the correct prefabs.
- UniTask and asynchronous programming
Unity’s workflow when it comes to async functions is kind of limited. Sure, you can use Coroutines to achieve all your async needs, but it is limited by it’s API. There is no easy way to return values from a coroutine, no easy way to “await” and continue with your code when the “routine” is complete and when queueing coroutines in sequence, all hell can break loose and you’ll have a great deal of pain finding out what and where did it break, as error handing in coroutines is also a big hassle.
UniTask is a c# Task wrapper for unity, that takes away some of the hassles that come with Tasks, mostly in terms of termination and lifecycle, as otherwise you’d have to cancel any running tasks explicitly in code and that is sometimes a little hard to adjust to if you haven’t worked with Tasks before.
UniTask allows us to better control flow on our application, making it easy to create “sequenced” flows that are awaited and offers better control, as well as flexibility on the usage of such functions.
I know right… that’s a lot of words and not so much context, but it is important to understand why these tools are handy and what they provide in your project.
I’ll wrap this up here and refrain myself from going into more details as well as implementations on the above, however, if you find your self in need of further explanations and the API provided for each tool is not clear enough, feel free to reach out, and I can potentially spin up a little side post addressing specific questions, or going into more detail on some of these.
For now, I’ll bid you farwell, and wish you a great day and happy development!
See you soon 🙂
